A Homelab With Zero Open Ports: How I Wired Three Homes and a VPS Into One Network
2026-08-11
Built and written with AI assistance. The decisions are mine.
I run a small homelab: photo backup, document archive, home automation, a private Git server, and more. The services live on Raspberry Pis in three different houses, plus one cheap VPS. I reach all of them from my phone, from my laptop, from anywhere.
My router has zero forwarded ports.
This article explains how, using Tailscale - and one of its newest features, Tailscale Services.
The problem
Self-hosting has a classic dilemma. Your services run at home, but you want to reach them from outside. The traditional options all hurt:
- Port forwarding. You punch holes in your router and hope that the login page of every service you expose is bulletproof. It is not. Shodan crawlers will find you within hours.
- VPN on the router. Works, until you have two houses, a VPS, and family members' devices. Now you are a network administrator, and you are the only person on call.
- Cloudflare Tunnel. Popular, but all your traffic flows through Cloudflare's infrastructure, and TLS terminates on their edge - they can see your data. Your photos and scanned documents included. If they change the terms, or have an outage, that's your problem now.
What I wanted instead:
- Every device reachable from every other device, regardless of location.
- No open ports, no public attack surface.
- Traffic encrypted end to end - no third party able to read it.
- All of it automated. I refuse to click through admin panels.
My setup in 60 seconds
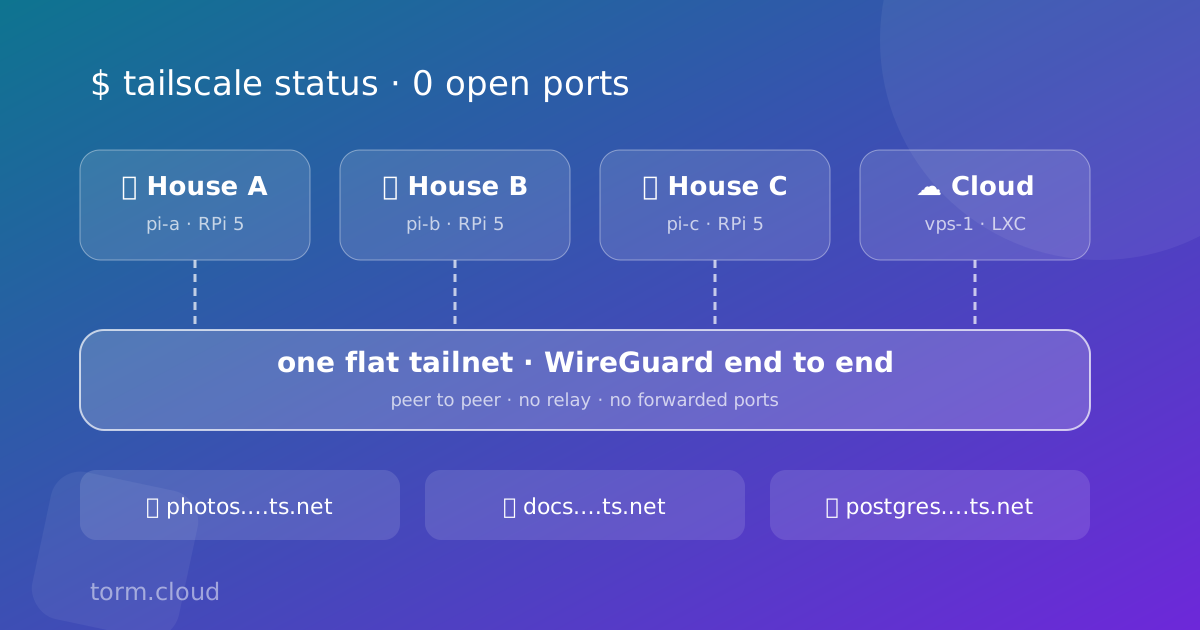
Four machines, four locations, one flat tailnet that my phone and laptop join too:
- pi-a, pi-b, pi-c - a Raspberry Pi 5 in each house. The services - Home Assistant, Immich, Paperless-ngx, Forgejo, PostgreSQL and friends - are spread across the three of them.
- vps-1 - a budget VPS. Not even a real VM: an LXC container on a shared host. More on why that matters later.
Everything is managed with Ansible from a single Git repository. If it's not in the repo, it doesn't exist.
How it works: WireGuard first
Tailscale is, at its core, WireGuard with the annoying parts automated. So let's start with WireGuard.
WireGuard is a modern VPN protocol with a radically small footprint - roughly 4,000 lines of code, versus about 100,000 for OpenVPN. Less code means less to audit and less to break. It is now part of the Linux kernel itself - something almost nothing gets to be, and a harder review to pass than any audit.
The design is very simple:
- Every device has a key pair, like SSH. The public key is the device's identity. There are no certificates, no negotiation, no cipher suites to misconfigure - one modern set of cryptographic primitives, take it or leave it.
- Packets travel over UDP, encrypted end to end between the two peers.
- It is fast. Fast enough that you stop thinking about whether you're "on the VPN". One caveat: the Tailscale client ships its own userspace implementation,
wireguard-go, not the kernel module. You give up some of that kernel-grade throughput - and you get, as we'll see, a VPN that runs on a container with no kernel access at all.
So why doesn't everyone just use plain WireGuard? Because of what it doesn't do:
- Key distribution is your job. Every pair of devices must exchange public keys. Four devices = 6 pairs. Ten devices = 45 pairs. Every new device means touching the config of every existing one.
- You must know where your peers are. WireGuard needs an endpoint - an IP and port. Home devices sit behind NAT, on addresses that change whenever the router feels like it.
Tailscale: WireGuard plus the missing 90%
Tailscale wraps WireGuard and solves exactly those two problems.
Key distribution. A coordination server keeps the list of your devices and their public keys, and pushes it to every member of your network (your tailnet). Crucially, your private key never leaves the device. The coordination server distributes public keys and connection metadata - it never holds the material needed to decrypt your traffic.
Stable addressing. Every device gets a permanent tailnet address from
100.64.0.0/10, plus an IPv6 address from fd7a:115c:a1e0::/48 and a DNS
name (MagicDNS). That range is a deliberate choice: 10.0.0.0/8 and
192.168.0.0/16 are what home routers hand out, so tailnet addresses taken
from there would collide with your own LAN. 100.64.0.0/10 is a reserved
block that almost nobody uses at home, which makes it free real estate.
These addresses exist only inside the tailnet - nothing outside
your network can even route to them. ssh pi-a just works, from any network,
anywhere in the world - as long as the device you're sitting at is in the
tailnet too.
NAT traversal. This is the magic that makes "zero open ports" possible. Both devices are behind NAT; neither can accept an incoming connection. The trick - UDP hole punching:
- Each device asks a STUN server "what does my public address look like from out there?" - Tailscale's DERP servers double as STUN servers. Then the coordination server passes those addresses to the other side. It is the exchange channel, not the source of the addresses.
- Both devices start sending UDP packets to each other simultaneously.
- Each router sees an outgoing packet and creates a NAT mapping for the reply. The other side's packets now count as replies.
- The hole is punched. From here on, traffic flows directly between the two devices, peer to peer, without any relay.
When NAT is too strict for hole punching, Tailscale falls back to DERP relays. Traffic passes through them, but it remains encrypted end to end - the relay only moves data it cannot read.
What Tailscale-the-company sees. This is the honest part every "just use Tailscale" post skips. Tailscale is also a third party. The difference from Cloudflare Tunnel is what passes through them - four questions, two answers:
- Does your traffic flow through them? Cloudflare Tunnel: yes, all of it. Tailscale: no, except a DERP fallback - and that stays encrypted.
- Can they read your data? Cloudflare Tunnel: yes, TLS terminates on their edge. Tailscale: no, end-to-end WireGuard.
- What does their outage do to you? Cloudflare Tunnel: services unreachable. Tailscale: existing direct connections keep working.
- What do they know about you? Cloudflare Tunnel: traffic contents plus metadata. Tailscale: device list, public keys, connection metadata.
Two honest caveats on that third row. DERP relays are Tailscale's infrastructure too, so any link that could not hole-punch and fell back to a relay goes down with them. And "keeps working" has a deadline: node keys expire, and only the coordination server can refresh them. A long enough outage takes the tailnet apart device by device.
Still: if the coordination server disappeared right now, my directly-connected devices would keep talking with the keys they already have. That failure mode I can live with.
Joining devices - with Ansible, not clicking
My rule for the whole homelab: changes reach devices through Ansible, never through SSH sessions or web panels. Tailscale is no exception.
The playbook is surprisingly short, thanks to a community role:
- name: Setup Tailscale
  hosts: tailscale
  become: true
  roles:
    - role: artis3n.tailscale.machine
      vars:
        # lookup('file') decrypts ansible-vault files automatically
        tailscale_authkey: "{{ lookup('file', tailscale_authkey_file) }}"
        # Tailnet hostname = inventory hostname
        tailscale_args: "--hostname={{ inventory_hostname }}"
Three details that matter:
- The auth key is generated in the admin panel: reusable, pre-authorized, and tagged. Reusable so one key enrolls every host; pre-authorized so no manual approval step; tagged so devices get their ACL identity from the start. Once per 90 days, though - Tailscale caps auth key lifetime at 90 days, so a permanent key does not exist. Rotating that one secret in the vault is the only manual step left in the whole setup. The good news: tagged devices have key expiry disabled by default, so my already-enrolled Pis never fall out of the tailnet. A stale key only blocks enrolling a new host.
- The key lives in an ansible-vault encrypted file, committed to the repo. Secrets in Git, but never in plaintext.
- The tailnet hostname is forced to match the Ansible inventory hostname. One name per machine, everywhere. Future-you will be grateful.
The VPS footnote. My cheapest node is not a virtual machine - it's an LXC
container on a shared host. LXC containers share the host's kernel, so anything
that needs kernel modules is off the table - including the /dev/net/tun
device the client normally uses. But Tailscale has a userspace networking mode
that drops even that requirement. This is where wireguard-go becomes an
advantage: give up a little throughput, and the most locked-down 1 EUR
container can join the tailnet.
Level up: Tailscale Services
If you run one machine in one location, everything above already gives you a
working network - by hand, in about fifteen minutes. What follows is optional.
It is also what turns pi-a:2283 into https://photos.…ts.net, and a name
you can remember beats an IP and a port even on a single host.
Plain Tailscale gives you device-level networking: pi-a has an address,
and Immich happens to listen on port 2283 there. That works, but the address
belongs to the machine, not the service. Move Immich to another host
and every bookmark, app config, and script breaks.
Tailscale Services (generally available since February 2026) fix exactly this.
A service gets its own virtual IP and DNS name - svc:photos becomes
https://photos.tailxxxxx.ts.net - and any device in the tailnet can
advertise "I host this service". The address survives container restarts and
host moves. It's a tiny bit of Kubernetes-style service abstraction, without
the Kubernetes.
Serving it is one command on the host:
tailscale serve --service=svc:photos --https=443 127.0.0.1:2283
Note what that just did: HTTPS with a real, valid certificate (issued via Let's Encrypt for your tailnet's domain), terminating on your own hardware, no reverse proxy container, no certbot cron job, no self-signed warnings on your phone.
Two pieces make it fully hands-off:
- Service definitions via API. Services must be declared in the tailnet policy. Clicking that into an admin panel would violate my no-clicking rule, so an Ansible task creates them through the Tailscale API using an OAuth client (scoped to Services read/write, credentials in the vault). The PUT is an upsert, so re-running the playbook is a no-op - the repo stays the source of truth.
- Auto-approval. An
autoApprovers.servicesentry in the policy file means a tagged host advertising a service is approved automatically. Enroll a host, run the playbook, service is live. Nobody clicked anything.
Every service in my homelab is one reusable task-file include:
- ansible.builtin.include_tasks: tasks/tailscale-service.yaml
  vars:
    ts_service: photos
    ts_backend: 127.0.0.1:2283
The result
Every service is now just a name in the tailnet, for example:
https://photos.…ts.net- photo backup (Immich)https://docs.…ts.net- document archive (Paperless-ngx)https://postgres.…ts.net- pgweb, a web UI for browsing my shared PostgreSQL
From my phone, I open the photos URL and genuinely do not know - or care - which house the server is in. That's the point: the name says what it is, not where it runs. Valid HTTPS, no VPN app juggling, no exposed login pages, and if I ever move a service to another host, its address moves with it.
All of it on the free plan: the device count, MagicDNS, the HTTPS certificates and Tailscale Services.
Router config: zero forwarded ports.